Salvage cars represent opportunity, a chance to recover valuable components, repurpose parts, or even rebuild an entire vehicle. But strip a salvage car incorrectly, and you'll damage what you're trying to save, hurt yourself, or create an expensive mess. After three decades in the motor trade, I've seen people pull apart everything from flood-damaged BMWs to accident-damaged commercial vans, and the difference between a profitable recovery and a waste of time comes down to method.
Learning how to safely remove and store parts from salvage cars isn't just about unscrewing bolts. It requires planning, the right tools, and an understanding of what you're working with. This guide walks through the practical steps to safely remove and store parts, whether you're sourcing parts for your own repairs, building a parts inventory, or simply maximising value from a salvage purchase.
Understanding What You're Working With
Before you touch a single tool, assess the vehicle thoroughly. Not all salvage cars are created equal, and the condition dictates your approach.
Category S vehicles have sustained structural damage. The chassis, frame, or critical load-bearing components were compromised. These cars can be repaired and returned to the road, but you need to identify which structural areas are damaged before you start removing parts. Pull components from undamaged sections first.
Category N vehicles have non-structural damage, think electrical faults, interior damage, or cosmetic issues. These often yield excellent parts because the mechanical components remain sound. A car written off for hail damage or a flooded interior can provide a pristine engine, gearbox, and suspension components.
Check the vehicle history before you begin. Water damage isn't always obvious, but it destroys electronics and corrodes connections. Fire damage weakens metal and leaves residue that contaminates parts. Impact damage can create stress fractures that won't show until a component fails under load.
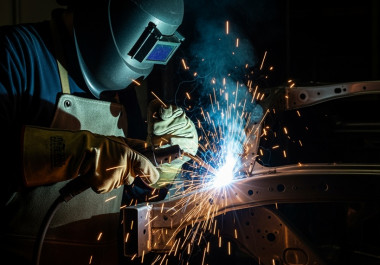
Essential Tools and Safety Equipment
You can't safely remove and store parts from a salvage car with a basic socket set and optimism. Invest in proper equipment before you start.
Core tool requirements: Socket sets in both metric and imperial (10mm to 19mm covers most applications) Breaker bar for seized bolts (you'll encounter plenty) Impact driver (battery-powered saves time and your wrists) Torx and hex key sets (modern vehicles use these extensively) Pliers and wire cutters for electrical connections Panel removal tools to avoid damaging trim and clips Jack stands and axle stands rated for the vehicle weight Engine hoist if you're removing powertrains (hire one if needed)
Safety equipment you can't skip: Safety glasses, rust, fluid spray, and metal fragments will find your eyes Heavy-duty gloves with cut resistance Steel-toe boots (components are heavier than they look) Respirator mask for dusty interiors or vehicles with mould Fire extinguisher kept within reach Spill kit for fuel, oil, and coolant
I once watched someone try to remove a fuel tank without draining it first, using a standard trolley jack instead of proper stands. The tank slipped, dumped fifteen litres of petrol across the workshop floor, and nearly caused a fire when sparks flew from a dropped tool. When you understand how to safely remove and store parts, you prioritise safety equipment. Don't be that person.
Preparing the Vehicle for Dismantling
Preparation prevents damage and speeds up the entire process. Rush this stage, and you'll spend twice as long fixing problems you created.
Disconnect the battery first. Remove the negative terminal, then the positive. This prevents electrical shorts and airbag deployment. Modern vehicles store enough charge in airbag systems to deploy for up to 30 minutes after battery disconnection, so wait before you start pulling interior components.
Drain all fluids before removing major components. Engine oil, coolant, brake fluid, power steering fluid, and fuel all need proper disposal. Use appropriate containers, old milk bottles aren't suitable for hazardous fluids. Many vehicle auctions include cars with full tanks, so factor in safe fuel removal.
Label everything as you disconnect it. Take photos with your phone before removing wiring harnesses, vacuum lines, and multi-connector plugs. You might think you'll remember where that eight-pin connector goes, but when you're surrounded by fifty disconnected parts, your memory becomes unreliable.
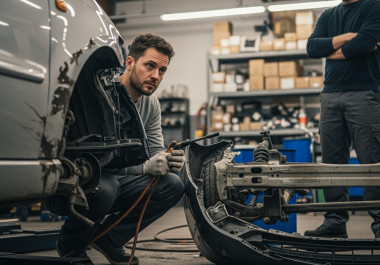
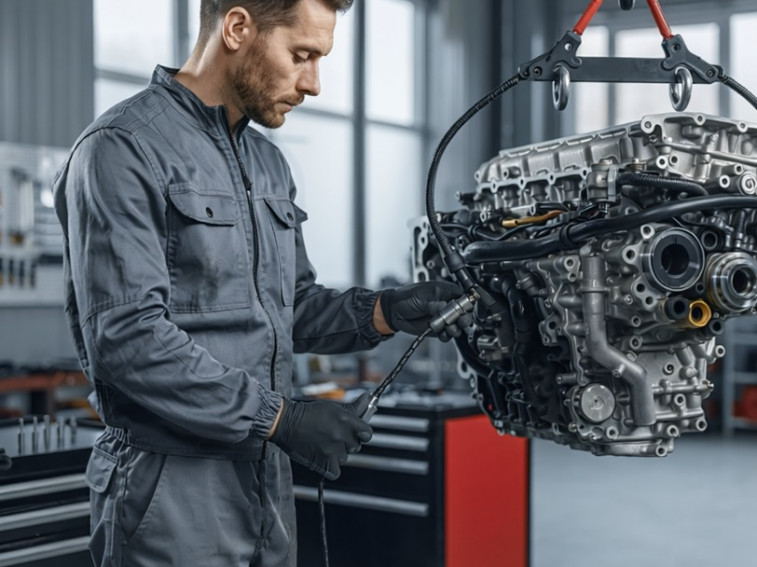
Removing Mechanical Components
Start with the easiest, most valuable components and work towards the complex assemblies. This approach maintains your motivation and generates quick wins.
Engine and gearbox removal:
The powertrain represents the highest value in most salvage vehicles. Remove it carefully, and you preserve that value. Support the engine from above using an engine hoist with proper lifting chains. Never trust a single point of attachment. Use adjustable chains connected to the engine's designated lifting points, usually cast into the block or head.
Disconnect everything before you attempt to lift. That includes exhaust systems (cut if necessary, but try to preserve catalytic converters), cooling system hoses, fuel lines (depressurise the system first), all electrical connections, driveshafts or CV joints, and engine mounts (leave these until last).
Removing the gearbox separately often proves easier than extracting the entire assembly together. Front-wheel-drive vehicles typically require you to drop the subframe, which means removing suspension components first. Rear-wheel-drive configurations usually allow you to unbolt the gearbox from inside the vehicle.
Suspension and steering components:
These parts suffer from corrosion and seized fixings. Apply penetrating oil to all bolts at least 30 minutes before you attempt removal. For severely corroded fixings, heat from a blow torch helps, but keep fire extinguishing equipment close.
Remove suspension assemblies as complete units where possible. A full suspension corner (hub, caliper, shock absorber, springs, and control arms) is worth more intact than as separated components. Buyers pay premium prices for complete assemblies they can bolt straight on.
Never cut springs unless you're scrapping them. Cutting a compressed spring releases enormous stored energy that can cause serious injury. Use proper spring compressors or remove the entire strut assembly and compress it safely in a vice.
Electrical and Electronic Systems
Modern vehicles contain dozens of control modules, sensors, and wiring harnesses worth recovering. The trick is removing them without damage.
Start with the obvious components, alternators, starter motors, and sensors. These unbolt easily and sell quickly. Then move to control modules (ECU, ABS module, airbag control unit). These sit in protected locations, usually under the dashboard or beneath seats.
When removing wiring harnesses, cut them long rather than short. Extra wire is easy to trim; insufficient length makes the harness useless. Follow the harness back to connection points rather than cutting randomly.
Door wiring looms pass through rubber grommets between the door and body. These often perish, so remove them carefully to preserve the grommet. Window switches, mirror controls, and central locking systems all have value, particularly for premium brands where new replacements cost hundreds.
Interior Component Removal
Interiors yield surprising value if you're methodical. Leather seats, dashboard assemblies, and trim panels all find ready buyers, but only if you extract them undamaged. Learning how to safely remove and store parts means being meticulous with interior components.
Seats and trim:
Seats bolt to the floor through four mounting points, usually hidden under plastic covers. Disconnect electrical connections for heated seats, airbag connections, and seat belt pre-tensioners before unbolting. Airbag connectors use special locking mechanisms, force them and you'll break the clips.
Dashboard removal requires patience. Modern dashboards integrate air conditioning systems, wiring harnesses, and structural components. Start by removing the steering wheel (mark the position first), then work outwards removing trim panels. Take photos at every stage.
Trim panels clip into place and break easily. Use proper trim removal tools rather than screwdrivers. Work around the edges, releasing clips progressively. Forcing a panel damages both the panel and the mounting points.
Storing Removed Parts Properly
You've invested time and effort extracting components. Poor storage destroys that investment. Knowing how to safely remove and store parts includes proper storage methodology for long-term profitability.
Clean everything before storage. Remove dirt, grease, and debris. This prevents corrosion and makes parts more attractive to buyers. Use appropriate cleaners, degreaser for mechanical components, interior cleaner for trim and upholstery.
Storage solutions:
Mechanical components need protection from moisture. Store engines and gearboxes on pallets, never directly on concrete floors. Cover them with breathable tarpaulins, not plastic sheets that trap moisture.
Electrical components require dry, temperature-stable storage. Control modules and sensors suffer from condensation and extreme temperatures. Store them in sealed plastic containers with silica gel packets.
Small components disappear easily. Use labelled storage boxes for fixings, clips, and sensors. Nothing wastes more time than searching for a specific sensor you removed three weeks ago.
Store glass components vertically, never flat. Windscreens and windows crack under their own weight when stored horizontally. Wrap them in bubble wrap and lean them against walls with padding.
Handling Hazardous Components
Salvage vehicles contain components that require special handling. Ignore these risks, and you create environmental hazards or legal problems.
Airbags and pre-tensioners:
Undeployed airbags remain dangerous. They contain explosive charges designed to deploy within milliseconds. Store them in secure locations away from heat and impacts. Many buyers want complete airbag systems, but only if you've handled them correctly.
Deploy airbags before disposal if you're not selling them. Connect them to a 12V battery using long wires, take cover, and trigger deployment remotely. Never attempt to dismantle an undeployed airbag.
Fluids and filters:
Engine oil, coolant, and brake fluid all require proper disposal. Your local recycling centre accepts these fluids, but you must transport them safely in sealed containers. Don't mix different fluid types, this complicates recycling.
Fuel tanks need careful handling. Even "empty" tanks contain vapour that's potentially explosive. Drain tanks completely, then flush them with water before removal. Store drained fuel in approved containers, never in repurposed bottles.
Maximising Part Value
The effort you invest in careful removal pays dividends when selling parts. Buyers pay premium prices for components they can install immediately without additional work.
Test electrical components before storage. A faulty alternator is worth scrap value; a working one commands 60-70% of new retail price. Simple testing using a multimeter or by temporarily installing components proves functionality.
Photograph parts from multiple angles with good lighting. Include any identifying numbers, brand markings, or condition issues. Buyers need confidence they're purchasing the correct component in acceptable condition.
Store parts with their fixings. An engine missing its bell housing bolts or a suspension assembly without its mounting hardware loses value. Keep related components together.
Research prices before listing parts. Check completed sales on auction sites and parts marketplaces. Premium brand components (BMW, Mercedes, Audi) hold value better than mass-market equivalents. Performance parts from hot hatches and sports cars often sell for more than the same components from standard models.
Working With Different Vehicle Types
Commercial vehicles, motorcycles, and specialist vehicles each present unique challenges.
Vans and light commercials often feature simpler mechanical systems than cars, but heavier components. A van's cargo area provides excellent working space for laying out parts as you remove them. Load-bearing components (chassis rails, suspension) suffer more wear in commercial vehicles, so inspect carefully before investing time in removal.
Motorcycles require different tools and techniques. Components sit more exposed, making removal easier, but motorcycles use more specialised fixings. Invest in proper motorcycle stands before attempting to strip a bike, they're unstable when partially dismantled.
Motorhomes and campervans combine vehicle and habitation systems. The living area contains appliances, furniture, and systems worth recovering separately from mechanical components. Water pumps, heating systems, and leisure batteries all have value to the motorhome community.
Legal and Environmental Considerations
Stripping salvage vehicles brings responsibilities beyond the mechanical work.
You must dispose of hazardous materials legally. Engine oil, coolant, brake fluid, and air conditioning refrigerant all require proper disposal. Your local authority provides guidance on approved disposal sites. Illegal disposal carries substantial fines.
Catalytic converters contain precious metals and attract theft. If you're storing removed catalytic converters, secure them properly. Mark them with identifying information and photograph them. This protects you if questions arise about their origin.
Keep documentation for the salvage vehicle. The V5C logbook, purchase receipt, and any correspondence with the auction house or seller prove legitimate ownership. This matters when selling valuable components like engines or when scrapping the remaining shell.
When the vehicle is fully stripped, dispose of the shell through an Authorised Treatment Facility (ATF). These facilities issue Certificates of Destruction, which formally remove the vehicle from DVLA records. Never abandon vehicle shells, this creates environmental hazards and potential legal liability.
Common Mistakes to Avoid
Experience teaches lessons, often expensive ones. Avoid these common errors.
Don't underestimate time requirements. Completely stripping a vehicle takes days, not hours. Factor in seized bolts, unexpected complications, and the physical demands of the work. Rushing leads to damaged parts and injuries.
Don't mix parts from different vehicles without clear labelling. That pile of alternators might look identical, but mixing a 90-amp unit with a 120-amp unit causes problems for buyers and damages your reputation.
Don't ignore safety procedures because you're working alone or in a hurry. Most serious workshop accidents happen when people skip safety steps they know they should follow. Jack stands prevent crushed limbs. Safety glasses prevent blindness. Use them.
Don't start removing parts you can't store properly. Extracting a complete interior then leaving it exposed to weather wastes all your effort. Ensure you have appropriate storage before you begin removal.
Building Your Parts Removal Skills
Like any skill, parts removal improves with practice. Start with simpler vehicles and progress to more complex models.
Modern vehicles integrate systems in ways that make removal challenging. A simple headlight assembly might require removing the front bumper, wheel arch liner, and disconnecting multiple electrical systems. Research specific vehicle quirks before you start, online forums and workshop manuals provide invaluable guidance.
Consider specialising in specific brands or vehicle types. Becoming the go-to source for BMW parts or commercial vehicle components builds reputation and allows you to work more efficiently. You'll learn the quirks, common failure points, and most sought-after components for your chosen specialism.
Join online communities focused on parts recovery and salvage. These groups share technical advice, tool recommendations, and market intelligence about which parts command premium prices.
Making Parts Recovery Profitable
If you're stripping salvage vehicles commercially rather than for personal use, profitability depends on efficiency and market knowledge.
Buy strategically. Focus on vehicles where the damage is isolated. A car written off for rear-end damage provides a complete front end, interior, and powertrain. Impact damage to one corner leaves three good corners to harvest.
Calculate recovery value before bidding. Research typical selling prices for major components (engine, gearbox, doors, lights, interior) and estimate conservatively. Factor in your time, storage costs, and disposal fees for the remaining shell.
Develop relationships with regular buyers. Repair shops, restoration specialists, and DIY mechanics provide steady demand for quality used parts. Reliable supply of correctly described, functional components builds trust and repeat business.
Consider whether to break vehicles completely or sell them as rolling shells after removing key components. Sometimes a partially stripped vehicle with a seized engine but good body and interior sells for more than the sum of individual parts.
Conclusion
Understanding how to safely remove and store parts from salvage cars combines mechanical knowledge, proper equipment, and methodical approach. Rush the process, and you'll damage valuable components or hurt yourself. Take time to plan, use correct tools, and follow logical sequences, and you'll recover maximum value while minimising risk.
Whether you're sourcing parts for your own projects, building a parts business, or simply maximising return from a salvage purchase, the principles remain constant. Assess before you act, disconnect before you remove, and store properly after extraction. Learning how to safely remove and store parts protects both your investment and your safety.
The salvage industry offers genuine opportunities for people willing to invest effort in proper parts recovery. Vehicles written off for isolated damage often contain hundreds of pounds worth of serviceable components. Your ability to safely remove and store parts from salvage cars determines whether you're running a profitable operation or just creating an expensive pile of scrap.
When you're ready to explore salvage vehicle opportunities systematically, explore RAW2K to understand our platform's commitment to connecting buyers with verified salvage inventory. You can then discover salvage vehicle opportunities through our comprehensive auction listings. Expand your sourcing across different vehicle types: view current car listings, explore bike salvage options, and browse machinery inventory.
Start with simpler projects to build skills and confidence. Invest in quality tools that make the work safer and more efficient. Learn from mistakes, because you'll make them, everyone does. The difference between amateur and professional parts recovery isn't perfection; it's learning from errors and continuously improving your process.
When you're ready to scale your parts recovery operation, become a RAW2K member and gain access to daily auction inventory. For guidance on evaluating specific vehicles for parts recovery potential or understanding market demand for particular components, get professional advice from our team.